The PaywayWS Integration Guide will describe the general integration process including
accessing our development, staging, and production servers.
I. Credit Card Data
To use Google Pay, a user must register a credit card account within their Google account.
The PaywayWS integration supports web-based payments.
The user can pay for products and services using a Google Pay button you present on your
web page. PaywayWS decrypts and manages the encrypted data and the interaction with the
payment processors.
II. Recurring Transactions
After a user enters a Google Pay transaction, you will have access to a paywayAccountToken
that references the Google Pay account used for the transaction. This token can then be
used to enter recurring transactions, just like any other tokenized account.
III. Integration Method
To integrate with Google Pay you will use the PaywayWS RESTful web service. The
acquisition and processing of Google Pay data will be done on the web browser via a
JavaScript. We will provide you with a sample JavaScript that can be plugged into your
payment page. This script presents the Google Pay button on your page and sends Google
Pay data to PaywayWS. We take care of all cryptography and certifications with Google Pay.
Details on the JavaScript can be found in Section XI, Code Details.
IV. Managing Payway Transactions
The Payway Google Pay integration uses the PaywayWS RESTFul API to validate Google Pay
merchants and perform Google Pay transactions. To manage your transactions, you can use
PaywayWS requests. These include reading transactions and updating user accounts where
needed. Reports and other payment management functionality is provided by Payway’s web
application.
V. Managing Google Pay Data Collection
The included Google Pay JavaScript provides a section that controls the collection of
payment data by your application. This controls the payment sheet and required fields that
are presented when a user processes a payment with Google Pay. This can be set up to
collect a minimum of cardholder name and zip, or full data including phone number. Note
that requiring all data may require the user to modify their Google payment account since
the Google Pay page will enforce your requirements. All request and reply fields are
documented by Google here:
https://developers.google.com/pay/api/web/reference/object#PaymentOptions
VI. Google®, Inc. Policies and Procedures
A. Brand Guidelines
Ensure the first mention of Google Pay on any feature page or developer
documentation includes the trademark symbol, ™ , on the first or most prominent
time it appears. Google enforces brand guidelines to protect the user experience
related to Google Pay. Details of these requirements can be found here:
https://developers.google.com/pay/api/web/guides/brand-guidelines
B. Developer Documentation
The main resource page for Google Pay integrations is here:
https://developers.google.com/pay/api/web/overview
C. Integration Checklist
This checklist is helpful as a reference to guide your integration. You will be
connected to Payway’s development server during the development phase. See the
PaywayWS Integration guide for information on development and staging servers.
VII. Acceptable Use Policy
This page outlines the acceptable use policy for Google Pay:
https://payments.developers.google.com/terms/aup.
You should also reference the acceptable use section of your Payway agreement.
X. Integration Steps
Processing a Google Pay payment is done in three steps. The first step and the final step
are executed from your server. Step two is handled in the JavaScript that we provide, and
you modify according to your needs. During a Google Pay transaction, only the
paywayRequestToken, resultCode, and paywayMessage are available to the browser. See
the PaywayWS Integration Guide for details on data fields.
Below is a diagram of the steps for a PaywayWS enabled Google Pay transaction.
DO NOT EXECUTE STEPS 1 OR 3 FROM A JAVASCRIPT. THESE INVOLVE DATA THAT SHOULD NOT BE PASSING THROUGH THE CLIENT BROWSER.
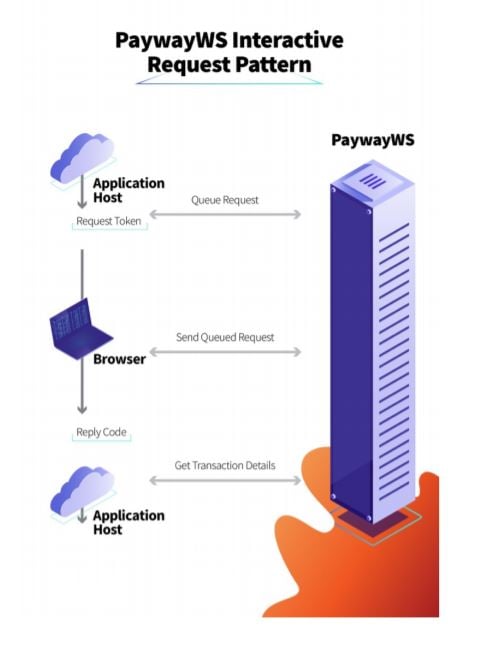
A. Step 1: Queue Transaction
Before presenting the page with the Google Pay button, you will send PaywayWS a
queueSale or queueAuthorize request. This request will return a
paywayRequestToken that will be used to complete the request.
The purpose of this request is to avoid sending transaction information to the browser
that can be manipulated by the user. The queued payment includes the payment
amount, source id, and payment type. Once this step is completed the Google Pay
button can be displayed on your page. Note you should not send a
paywaySessionToken to the web site, this can be accessed by the user and used for
unauthorized transactions.
B. Step 2: Send Queued Transaction
When you load the payment page and present the Google Pay button, you will send to
the page the paywayRequestToken that was returned in step 1. No other data should
be sent to the page. When the user clicks the Google Pay button, an interaction with
the Google Pay payment sheet happens. When the user approves the payment, a
sendQueuedTransaction request is sent by the JavaScript to Payway and the
transaction is processed. Only the resultCode and paywayMessage are returned to the
web page.
C. Step 3: Hosted Payment Results
Using the paywayRequestToken from the previous steps, you may call
hostedPaymentResults to get details on the completed transaction. The account
information entered by the user on the Google Pay sheet will be returned, with the
credit card number masked.
At this point you can store and/or present any of this information to the user for
receipt purposes or other processing. This interaction is between your server and
PaywayWS so none of this information is available to the browser during the
transaction.
When this call is complete the paywayRequestToken is invalidated on Payway. This
call is optional, if you skip it the paywayRequestToken will expire without further
action.
XI. Code Details
A. Queue Transaction
See the PaywayWS-Integration-Guide for details and samples of the queueSale and
queueAuthorize transactions.
B. GooglePay.js JavaScript
To integrate with Payway’s Google Pay offering, start with the sample JavaScript
called GooglePay.js. This contains all features you need to integrate the web client
with Google Pay.
C. Card Networks and Authorization Methods
The configuration in GooglePay.js has the supported card networks and authorization
methods. Change the supported card networks if you would like to remove one or
more of the entries.
const allowedCardNetworks = ["AMEX", "DISCOVER", "JCB", "MASTERCARD", "VISA"];
const allowedCardAuthMethods = ["PAN_ONLY", "CRYPTOGRAM_3DS"];
D. Required Billing Data
This section sets up the required billing data for presentation of the Google Pay
payment sheet. Do not require less than ‘MIN’ billing address parameters. For card not
present transactions the zip code must be presented to avoid extremely high charges
to the merchant.
billingAddressRequired: true,
billingAddressParameters:
// MUST BE AT LEAST ‘MIN’ but ‘FULL’ recommended
{
format : 'MIN', // ‘FULL' for complete address info
phoneNumberRequired : true
}
E. Additional Cardholder Data
Some account data accepted by Payway will not appear on the Google Pay billing
sheet. For example, email address can be added to your payment page and sent in
along with the Google Pay encrypted data.
F. Adding the Google Pay Button
On your payment page simply add this html:
<div id="googleButton"></div>
G. Loading Google Pay
The Payway JavaScript and the Google Pay JavaScript must be loaded on your
payment page:
<script src="js/GooglePay.js" type="text/javascript"></script>
<script src="https://pay.google.com/gp/p/js/pay.js" ></script>
When the page loads call onGooglePayLoaded:
<body onload="onGooglePayLoaded()">
H. OnGooglePayLoaded()
This method creates a payments client, checks if Google Pay is ready,
and sets up the payment gateway parameters.
In the tokenizationSpecification, use ‘exampleGatewayMerchantId’ until you go into
production with your merchant id.
tokenizationSpecification = {
type: 'PAYMENT_GATEWAY',
parameters: {
'gateway': 'payway',
'gatewayMerchantId': 'exampleGatewayMerchantId'
}
I. onGooglePaymentButtonClicked()
The payment data request is set up, and the payment is processed. Note that in
processPayment, the PaywayWS request is created and sent to Payway.
The googlePayToken field is set to the encrypted Google Pay paymentData, and the
paywayRequestToken is taken from the page. Other PaywayWS fields can be sent in
this request, such as email.
PaywayWS JSON request:
{
accountInputMode : "googlePayToken",
paywayRequestToken :
document.getElementById('paywayRequestToken').value,
request : "sendQueuedTransaction",
googlePayToken : paymentData ,
cardAccount :
{
accountNotes1: "notes1",
accountNotes2: "notes2",
accountNotes3: "notes3"
}
}
XII. Hosted Payment Results
See the PaywayWS Integration Guide for details on hostedPaymentResults. This is the
method for acquiring details on the completed transaction.